

What can I do to help the Macrofungi project?
Upload your photos to iNaturalist!
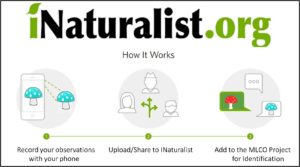
All photographs added to the Macrofungi of Lane County, Oregon project in iNaturalist will be identified or verified by local experts, as best we can (depends on how good the photos are and the fungus in question). The data will be used to document the range of the fungi within Lane County, and when they fruit (i.e., their phenology). The MLCO project is under the umbrella of the Fungal Diversity Survey (FUNDIS), and everything we hope to learn about fungi in Lane County will be usable by FUNDIS.
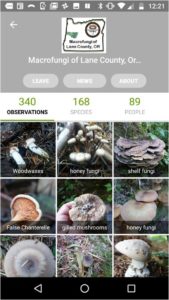
The Macrofungi of Lane County, Oregon (MLCO) project relies on your observations and documentation of the fungi in Lane County (or nearby). Both CMS members and the general public can participate. CMS Members may join an MLCO collection outing where we photograph and take specimens for DNA and herbarium collections. MLCO collection outings will be advertised to CMS members in the same manner as CMS field trips. Both CMS members and the general public may participate by photo-documenting fungi they find anywhere in Lane County.

You no longer have to join the MLCO project on iNaturalist in order for your observations to be included in the project. All observations uploaded to iNaturalist that are located within the physical bounderies of the MLCO project are now automatically added.
An iNaturalist Introduction to Mushrooming – Christian Schwartz
- Some notes from iNaturalist on getting started: Click here
Step-by-step instructions modified from iNaturalist.org
Note: Some phone types may behave slightly different.
- Please download the iNaturalist App to your smartphone before you go out (while you still have an internet connection). The first time you use iNaturalist, you’ll need to create an account and log in.
- Before you start photographing, make sure your GPS function on your phone is turned on/enabled.

- Open the iNaturalist app.
- Touch the camera icon.
- Take several photos (or select a photo from your photo library). To add additional photos, you touch the + next to your first image. Be sure to get photos of the gills/pores/teeth, as well as of the cap and stipe, if present. Don’t cut the stem off; dig out the whole base and make sure you photograph that. You can even photograph close-ups with your hand lens placed over your mobile phone’s camera lens (see You-tube video mentioned above).
- Identify your fungus to the best of your ability (at least type in “fungi” and it will autofill with “Kingdom Fungi”)
- Fill in some details:
- Location. Your smartphone will know where and when you are and fill in those details automatically (unless you don’t have this capability enabled, or if you’re on a WiFi-only tablet like many iPads, in which case you’ll need to put a pin on the map).
- Under the notes section, it is helpful to describe the habitat, such as kinds of trees, and aspects of the fungus that your photos do not show, like how it smells, tastes or bruises.

- Touch the Save button (some phones have a checkmark in the top right rather than a Save button).
- Touch Upload. If you are in an area without cell service, the app will store the entries and upload them after you return (you have to go back into the app and touch the cloud next to your images to start these uploads).
A LITTLE HARDER (computer method): The easiest option is often just fine, but often people prefer to use a camera to take pictures rather than their phone. Some, use a combination of phone and camera. Photos may also be better if you edit them first: cropping (zooming in), is especially helpful, but you can do more if you like. You can always add or delete photos in an observation once you have made it by clicking the edit option, so you can take some in the field and add edited ones later too.
Note: you may be using some of your phone data plan allocation if you upload in the field because you are not connected to the internet via wifi. From your home computer you can do a better job curating and avoid data upload limits. But, if you would rather upload with your phone, there really is no difference after the photos are uploaded. Make it easy for yourself, but also understand that good photos are easier to ID, which will make it easier for the data managers, and they can invest more time in getting other species on the list!
FAQs
What if I don’t know the name of the fungus I’m photographing?
Answer: It doesn’t matter! You can enter it as a “fungus” (or if you can: basidiomycete or ascomycete). Others will likely offer a name on iNaturalist, and MLCO project experts will offer a name. If it gets a DNA sequence, that in combination with the microscope work and your photos hopefully will provide enough information so that project experts can give it a name at some point in the future with some high certainty!
Why do I have to use iNaturalist?
Answer: You don’t have to, but you should. If you use it, your identifications will be verified to the best of our ability based on your photos and our collective knowledge of the local fungi. Your data will not be readily integrated into the project unless you use it, and it will greatly help the data managers for the project. iNat is open source software, it has free apps for all smartphones, and the effort is backed by the California Academy of Sciences and National Geographic (whereas MO has no institutional support). iNat is a bit cumbersome, but with frequent use becomes much easier. iNat is more versatile than the other platforms, and project managers can efficiently gather up all the data in one place if only one platform (iNat) is used. iNat, the standard for the NAMP project, is increasing.
What if I don’t have a Smartphone?
Answer: Not a problem, you can use any camera and any computer, laptop, or tablet connected to the INTERNET. Once you have your photo, load it onto your computer, then access INaturalist at this website. You will have to create an account before you start uploading your finds (pictures).